

May 25, 2026
When you think about it, everything you do in a day is a process. Whether it’s waking up in the morning (groan ⮕ drag self out of bed ⮕ make coffee), feeding your pets or paying bills online, every task can be broken down into a series of steps that feed into the larger process.
This is the thinking behind process mapping, where you can visually plot out processes, tasks and workflows. And while most people won’t jump at the opportunity to map out their morning routine, in a team or workplace setting, a process map can not only provide clarity to everyone involved in said process, but also serve to improve it.
Table of Contents
- What is a process map?
- Why should teams create a process map?
- Getting ready to map
- Overview of process mapping
- I have my map—now what?
- Conclusion
What is a process map?
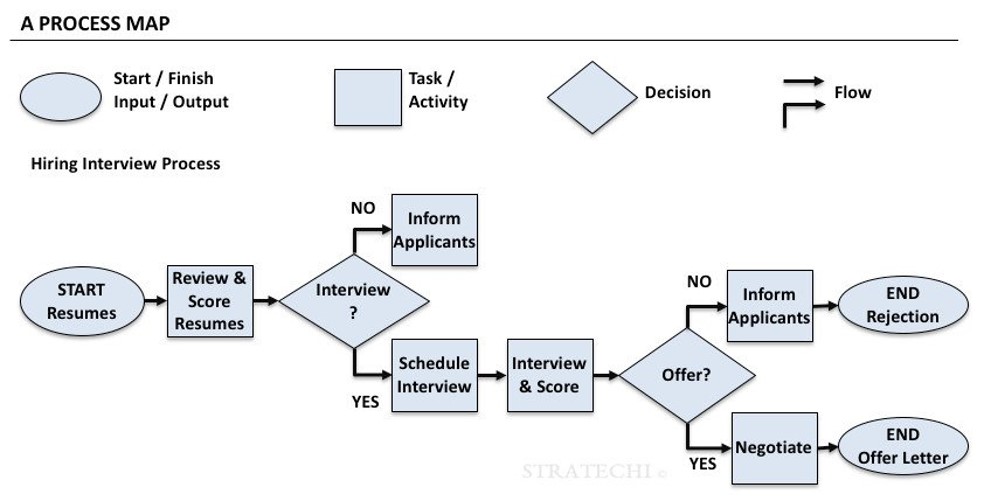
A process map is a tool used gain insight into—you guessed it!—a process. Teams pick a single process, define its start and end points, and brainstorm the tasks and steps that make up said process. In its visual form, it’s easy to identify where issues (such as wastes and redundancies) can occur and where changes could be made to improve the process. Process maps also assist team members in understanding what their counterparts do within the process.

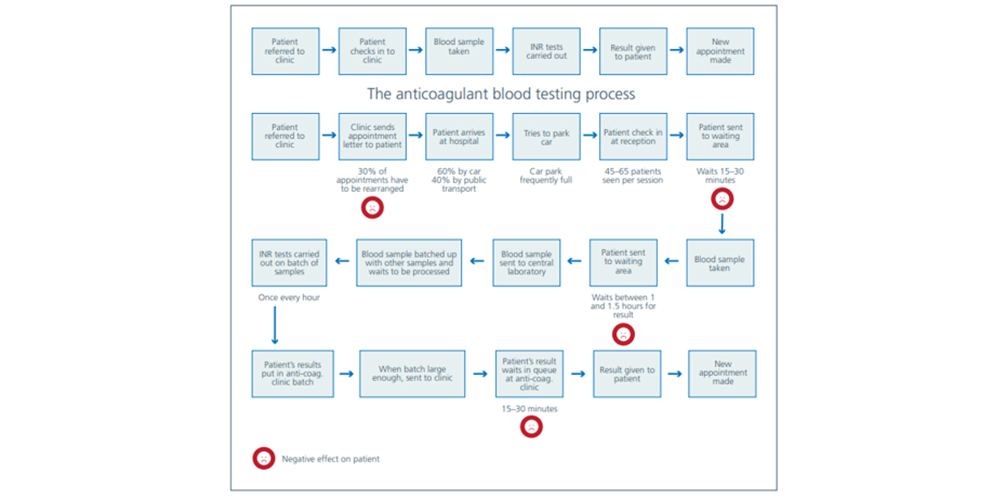
There are several variations of process maps, ranging from basic linear structures to multi-level, cross-functional pathways. They can also be drafted to reflect the changes they wish to make. This example, from the UK’s National Health Service, shows the steps involved in clinical blood testing. The red sad faces indicate negative impact on patients. With the information, the organization to work to improve this process and improve the patient experience.
Why should teams create a process map?
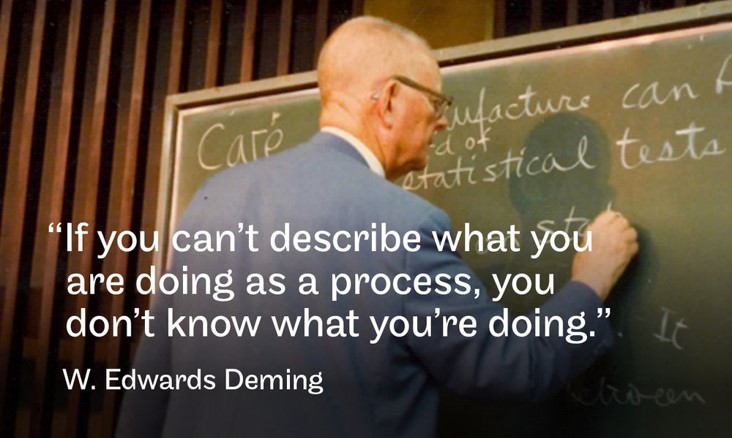
The essence of process mapping can be summarized by W. Edwards Deming, known colloquially as the godfather of QI: “If you can’t describe what you are doing as a process, you don’t know what you are doing.”
So you want to make improvements to a process—great! That said, a team needs a shared understanding of where they are starting from before they begin their improvement journey. Displaying the process, from point A to point B, provides this clarity—everyone can see what is currently happening. This clear articulation of your current state serves as a grounding point to anchor the team to the process and test (and measure!) true improvements.
Process mapping also encourages collaboration among teams—a theme that rings true through each step of the activity. Team members involved in the process at different areas (be it near the start, the end or somewhere in the middle) will undoubtedly have different perspectives on it. That is why it’s so important to include them in the process mapping activity—their point of view is vital to capturing all the information, so that an accurate snapshot can be taken and the right improvements can be made.
Getting ready to map
As facilitator, your goal is to set the team up for success. Prior to leading a process mapping activity, consider the following:
- Identify a process to examine. Use baseline measures or survey data to determine what to improve on.
- What is your project aim? Who should be on the team and what are their roles?
- Talk about it. Get in touch with anyone on the team who may be impacted. Listen and answer questions as best as you can—as discussed above, the more perspectives taken into consideration, the better.
There are many tools available for facilitators leading a process mapping activity. For the digitally inclined, online collaboration apps such as Mural, Miro or Google Jamboard are user-friendly and efficient. If you prefer the analog method, butcher paper, sticky notes and markers will serve you just as well.

Overview of process mapping
1. Determine the boundaries
Every good project begins with a plan, and process mapping is no different. First, determine where you want the process to begin and end. This might take some time and revision. It is also important to agree on the perspective you will be mapping. Often, teams will form the process map based on their client perspective, but other instances it may be more relevant to map from a specific internal perspective.
Take joining the QI Power Hour webinar, for example. One would assume that a person could click the link to join the call, and that would be the starting point. But think back further: How did they receive the link? They don’t just have the link in front of them ready to go. At some point, they would have had to become aware of QI Power Hour—by joining a mailing list, following HQC on social media or hearing about it from a colleague—and consent to the value the product offers them. These are called inputs (more on those in the next steps) and will undoubtedly vary from person to person. By involving the larger team in this conversation, those multiple perspectives can be taken into consideration to broaden the starting point.

The same is true for the end of your process: Different perspectives will have different endpoints, be it clicking out of the webinar, filling out the post-event survey or visiting the website to learn more about the series.
A process map is only as successful as the team who makes it, so be sure to involve anyone involved in the process—even if it’s minimal. Additionally, consider what is reasonable from your team and their sphere of influence.
2. Identify the steps
With the beginning and ending established, it’s time to start identifying steps. If your team needs some prompts, consider the following:
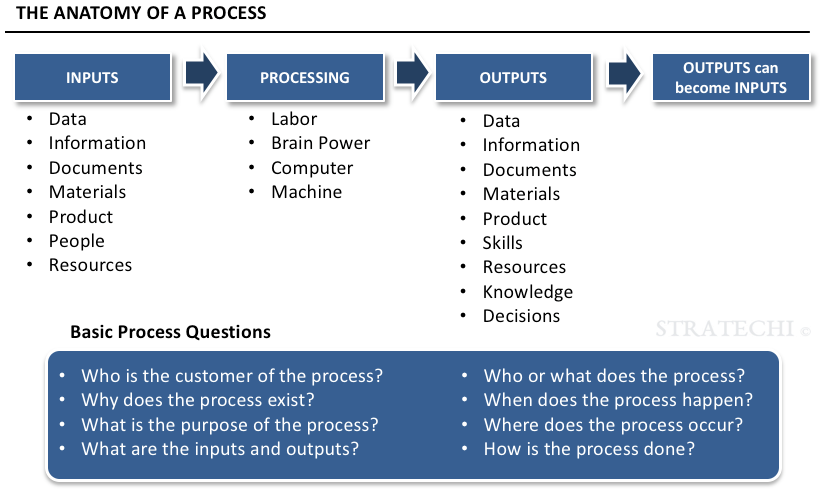
- Outputs: What is the product(s) of the process as it currently exists?
- Inputs: What needs to already exist or happen for the process to occur? For example, this could be the newsletter you are subscribed to that had an advertisement for QI Power Hour.
- Process: Once you have inputs and outputs, you can ask your team what will take them from the inputs to the outputs—what’s happening between those two to meet the aim of the process?
While it’s tempting to start drawing in arrows, resist the urge for now—keep brainstorming and ensure all team members can contribute and make a robust offering of steps. Use a verb (action word) to capture each step: joins newsletter, clicks link, completes feedback form and so on.
3. Sequence the steps
Once you have the steps and are starting to see some flow, it’s time to start sequencing. Talk to your team to find out how they’re completing the process in its present, current state—not as it may appear in the future.

If you’re facilitating this conversation, it’s important to get everyone at the table involved. If someone is quiet or you feel they’re not contributing, consider talking to them one-on-one to get their perspective on the process. Their input to this larger conversation will ultimately help with the improvement process.
4. Categorize information
Up until this point, the only arrows or direction may have been with back loops. However, now that we have a better understanding of the process flow, we can start with adding arrows. We can also start to categorize the steps into inputs, outputs, tasks and decision items. If it’s helpful, you can use different shapes or colours for each category to keep the map organized.
The process may be overwhelming (especially if there are a lot of steps involved). If you sense the process is headed in that direction, ensure you are grounding the team in the scope and aim of the project.
This is also an opportunity to capture elements of the process that aren’t working. This can include duplicate or unnecessary steps, areas of waste or other unhelpful variations. There may also be steps that no longer fit into the process, or they’re related to other steps by don’t necessarily fit into the process. Determine with your team if they’re truly needed for the process or can be wrapped into another step. Remember, you are mapping your current state so it is ok if there are steps that your future selves wish to remove, but it is important to capture these steps to truly understand your current state.
5. Check completeness
At this step you’re able to layer in important details, including the names of team members, a map title and the current date. Consider this completed process map a “snapshot” of the current state—something you can easily reference when you look back at it in a year or two. Including team member names help your future selves in knowing what perspectives were captured in the mapping process.

6. Finalize the map
The final step allows the team to take the articulated map and test the process. Ensure those involved have access to the finished map by displaying it within a daily visual management or team huddle board. That way, members can see what the process looks like and it’s top-of-mind for them throughout the day. Additionally, if they have feedback, they can easily add it to the map for edits later on. Your goal is to ensure that what you have mapped is truly reflective of your current state.
I have my map—now what?
Once finalized, you can start looking at what the map is telling you. Some elements that may become apparent in this visual form include:
- Redundancies: If two or more people are doing the same steps within the process, can it be streamlined or eliminated?
- Feedback loops: Are any outputs being returned to the process and used as inputs?
- Bottlenecks: Are any of the steps causing a delay or slowing down the process?
Check in with the team to gauge they feel about the process. Make space for the conversation—where can the process be improved? What does that look like? Who is impacted by this change, or how long would that take to implement? If you’d like to dive deeper, consider additional QI components; the PDSA cycle, work standard or A3 form can help you go the extra mile and bolster your improvement efforts.

Conclusion
It is natural to want to make organizational processes more efficient, or to eliminate unnecessary steps. But first, the relevant stakeholders and team members need to be on the same page. Process maps are a great option to depict a process within a team and provide this clarity, while encouraging collaboration and input from team members. Completing a map can visually show, from start to finish, all steps and decisions points involved in a single process (and who executes them). This organizational snapshot can serve as a jumping off point for improvement initiatives within an organization.
More resources: